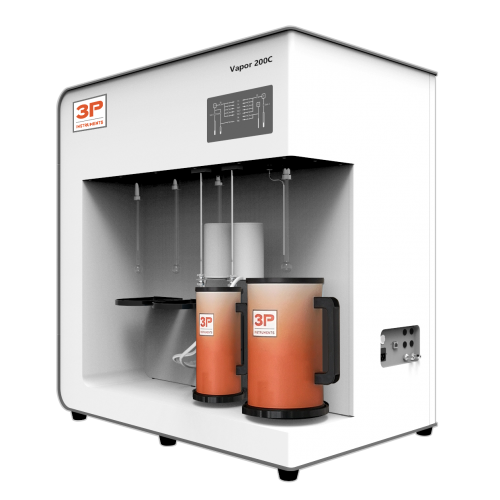
Features:
• Test Module
Internal temperature of test module can be controlled through Real-time monitoring, ensuring accuracy of adsorption detection.
• Saturated Vapor Pressure P0
Using independent P0 pressure sensor for P0 value by inching test, guarantees the reliability of experimental data. Atmospheric pressure input method to determine P0 also be selected.
• Vacuum System
It’s a multi-channel, adjustable, and parallel vacuum system. Vacuum degree of this system can be controlled in segments.
This design prevents the sample from being pumped into analyzer. Meanwhile, a delicate part was designed for ensuring cleanliness of vacuum system, minimizing dust pollution.
• Sample Preparation System
In addition to two pretreatment stations, the other two analysis stations can be used in preparing samples. There is no interference between pretreatment stations and analysis stations. Degas temperature can be set individually and controlled from ambient to 400 ℃.
• Micropore Distribution
Accurately apply the HK method, SF method and other micropore analysis model, the aperture deviation of micropore is less than 0.02 nm.
Pressure Sensor
Micro 200C with 1torr (selectable 0.1torr) makes the partial pressure of P/P0 up to 10-7 - 10-8 (N2/77K) in the physical adsorption analysis.
• Cold Free Space
Cold free space can be corrected by Helium automatically, ensuring accuracy of test results.
This calibration method is suitable for testing of any powder or particle material.
Control of Liquid Nitrogen level
Using High volume (3L) Dewar flasks and working with the seal cover assure a constant thermal profile along the length of sample tubes and P0 tubes throughout testing process.
• Turbo Molecular Pump
Molecular pump is a standard configuration part on the Micro 200C. The ultimate pressure is up to 10-8 Pa, providing a strong support for micropore analysis in the ultra-low pressure. The smallest micro-pore diameter can be tested is 0.35
Control and Analysis Software
Micro Software is intelligent software in operation control, data acquisition, calculation and analysis and report generation on the Windows platform. This software can communicate with the host through the LAN port and remotely control many instruments at the same time. Software adopts a unique intake control method, the pressure in adsorption and desorption process is optimally set in six- stage; this flexible design is helpful for improving test efficiency.
Clear tabular reports include:
Adsorption and desorption isotherms
Single-/Multipoint BET surface area
Langmuir surface area
STSA-surface area
pore size distribution according to BJH
t-plot
Dubinin-Radushkevich
Horvath-Kawazoe
Saito-Foley
| Feature | A | B | C |
| Adsorbed Gas | Non corrosive gases, such as N2, Ar, Kr, H2, O2, CO2, CO, NH3, CH4, etc. | ||
| Pressure Sensor at Analysis Station |
1000 torr, 2 | 1000 torr, 2; 10 torr, 1 (optional 2); 1 torr(0.1torr can be selected), optional 1 |
1000 torr, 2; 10 torr, 2; 1 torr (0.1torr can be selected), 2 |
| Accuracy: ±0.15% (F.S.) | |||
| Pressure Sensor at P0 Station | 1000 torr,2 (Accuracy: ±0.15% (F.S.) |
||
| Degas System | Two ectopic sample preparation ports; (Analysis station supports in situ sample preparation) |
||
| Degas Temperature | Ambient to 400 ℃. Free to set up target temperature. | ||
| Cold Trap | 1 | ||
| Vacuum Pump | Two-stage rotary vane mechanical vacuum pump, the ultimate pressure is 6.7*10-2 Pa |
Two-stage rotary vane mechanical vacuum pump, the ultimate pressure is 6.7*10-2 Pa, optional turbo molecular pump |
Turbo molecular pump (ultimate pressure 10-8 Pa) and front mechanical vacuum pump (ultimate pressure is 6.7*10-2 Pa) |
| Analysis Port | Samples on the 2 analysis bits can be tested alternately (including P0 test). | ||
| Test Principle | Gas adsorption by static-volumetric analysis | ||
| Measurement Range of Specific Surface Area |
0.0005 m2/g to the infinity; Standard sample repeat accuracy is less than ± 1.0% |
0.0001m2/g to the infinity; Standard sample repeat accuracy is less than ± 1.0% |
0.0001m2/g to the infinity; Standard sample repeat accuracy is less than ± 1.0% |
| Test Range of Pore Diameter | 0.35 nm-500 nm; Pore dimension repeatability is less than 0.2 nm in the accurate analysis of materials with pore size greater than 2 nm | 0.35 nm-500 nm; Pore dimension repeatability is less than 0.02 nm in the accurate analysis of micropore 0.35 nm-2 nm | 0.35 nm-500 nm; Pore dimension repeatability is less than 0.02 nm in the accurate analysis of micropore 0.35 nm-2 nm |
| Minimum Pore Volume | 0.0001 cm3/g | ||
| Range of Relative Pressure P/P0 | 10-5-0.998 | 10-6/10-8-0.998 | 10-8-0.998 |
| Overall Dimension | Depth: 870 mm; width: 570 mm; height: 890 mm; weight: 80 Kg -90 Kg | ||
| Ambient Temperature | 15-40 oC | ||
| Related Humidity | 30%-60% | ||
| Electrical Supply | AC220 V ± 20 V, 50/60 HZ, maximum power 300W; | ||


